


 Pick a Date


Perfect for those days at home where entertaining the kids is no easy feat! Here are some super-simple paper arts and crafts ideas for cosy afternoons including pretty loo-roll butterflies and lovely ladybeetles.
Easy Paper Craft Activities For Kids
1. Toilet Paper Roll Butterflies
Decorate your child's room with these little beauties! They're super simple and can be as colourful and magnificent as you dream. You'll need a small toilet paper roll, some sheets of paper of different colours, scissors, glue or clear tape, a marker pen, and any additional bits you might want to decorate with (glitter, pipe cleaners, paint).
1. The Body: Wrap the toilet paper tube in a paper of your colour choice. Choose used wrapping paper, magazine paper, used clean foil, etc. Glue the paper together at the join (or use tape that doesn't show). Alternatively, paint the tube any colour.
2. The Wings: Design the wings to measure the same height as the tube. Make them wide enough to appear balanced. Use a very simple design for the wings, making a mirror image for the opposite side.
3. The Wings: Draw the design onto the scrap cardboard. Cut around each wing (or both wings if you have designed them already joined). The wings can be jazzed up a little by cutting them out with pinking shears.
4. The Wings: It's easiest to decorate the wings before affixing them to the butterfly. Any design is a-okay! Trace the same outline as the wing in decreasing size in different colours, to make a rainbow of colours. Use finger painting, stickers, glitter- anything!
5. Finishing Up: Glue or tape to the wings to the back of the covered toilet paper tube. Check that they appear even each side.
6. The Antenna: Glue two cotton buds at the top end of the butterfly. These form the antennae. They can be coloured by either drawing on them with marker or dipping them first in paint water and letting them dry before affixing to the tube. Alternatively, cut pipe cleaners in half and glue in place. Roll down the top of the pipe cleaner in a spiral, to make it seem more realistic. If you want to be even simpler- use paper cut out in the shape of the antenna!
7. Bring Her to Life: Draw two eyes and a smile at the top end of the butterfly, near the antennae. Alternatively, cut out pieces of felt or scrap paper in the shapes of eyes and a mouth and glue these on.
2. Paper Ladybeetles
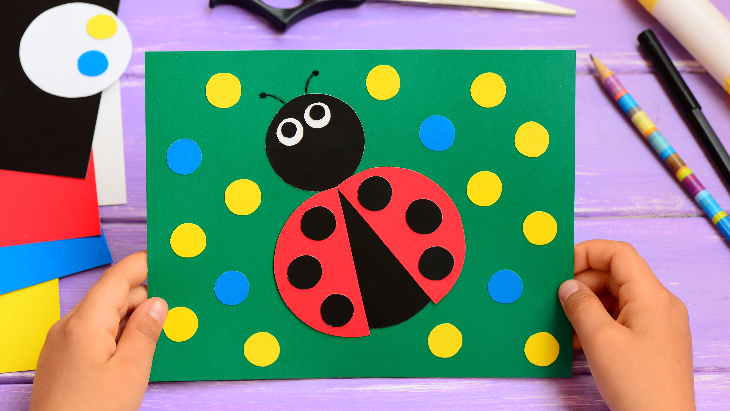
There are some trickier methods out there showing you how to make 3D lady beetles, but let's keep it nice and simple with this lady beetle art. All you need is various sheets of coloured paper or cardboard, scissors, glue, and maybe a marker pen.
1. Use one piece of paper/cardboard for the background- green if your ladybird is in the garden, maybe blue if she's flying through the sky.
2. For her body, cut circles from the black paper in various sizes- a big one for her body, a medium-sized one for her head, two small ones for eyes, and a few for decorative dots to be stuck onto her red wings.
3. Cut out two red semi-circles for wings, and stick them at an angle off her black circle body.
4. Cut out two small white circles for the whites of her eyes and stick them on the blackhead, followed by two smaller black circles.
5. Draw antennae protruding from her head with a marker.
6. Decorate the background however you wish- draw on it with texter, cut out circular coloured dots for flowers, get creative!
3. Toilet Paper Roll Towns
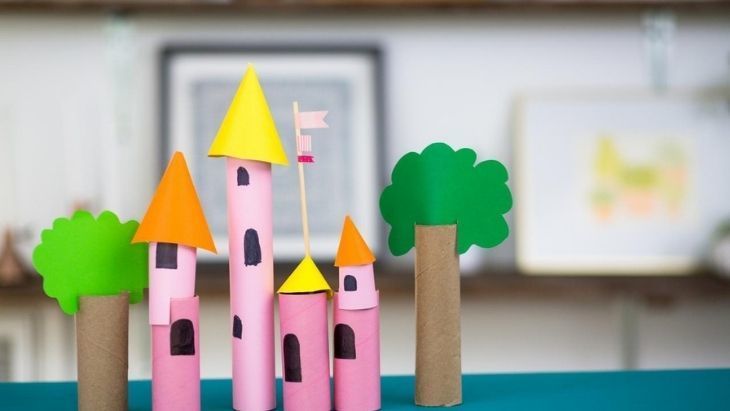
Create a single abode or get crafty all day long and build a whole little rainbow village! You'll need as many toilet paper rolls as you like, coloured markers, scissors, glue, coloured paper, and any extra decorative bits and pieces you might like.
1. Paint the tube and let it dry, or leave it grey and just draw patterns, windows or designs onto it.
2. Make two angled cuts into one end of the tube to form a point.
3. Fold a 3- by 3 1/2-inch piece of scrapbook paper in half, then set it on the pointed end as a roof. Use tacky glue to secure it. Make two cuts to create a rectangular door (see here for a visual). Glue on a bead for a doorknob.
4. Draw windows onto coloured paper, cut them out, and attach them to the cottage using a glue stick.
5. For a chimney, fold a strip of paper into a four-sided, open-ended box, and glue it to the roof.
More Creative Fun For Kids
Easy Science Experiments For Kids
Fun Trivia Questions for Kids (With Answers)
How to Make a Lava Lamp
Have you signed up to our newsletter? Join ellaslist to get the best family and kid-friendly events, venues, classes and things to do NEAR YOU
Reviews